How to Print Headings on Every Page in Excel?
How to Print Headings on Every Page in Excel?
Sometimes
you may need to print same column headers on every page in Microsoft
Excel. And to do so, you don't need to manually copy the headers on
every page. You can simply set a command from page setup option to print
column headers on every page automatically!
In my previous post, I discussed about how to lock or freeze column headers.
By freezing rows or columns, you can just show headers at the time of
scrolling. But they will be printed on the first page only. In this
tutorial, you will learn - how to print same column headers on every
page automatically . . .
Applies to:
- MS Excel 2000/ XP
- MS Excel 2007/ 2010/ 2013
Note: This tutorial has been prepared using Excel 2013. So, few options may differ slightly.
Let's start -
- Open a previously saved worksheet or create a new one in MS Excel.
- Go to the Page Setup option from Page Layout Tab (Office XP/ 2000 users should find it under Edit Menu).
- Go to the Sheet tab from Page Setup.
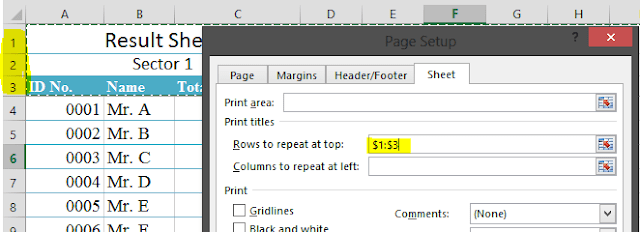
- Look at the Print titles option: Rows to repeat and Columns to repeat.
- To repeat the headers at the top, click on the first one. Or click on the second one to repeat the columns.
- After clicking the box, select the area of your sheet which needs to be repeated. Follow the image below.
- Hit OK to close the Page Setup. Done! Now check by printing or look at the print preview.

Here I
showed the process for rows only. You can also choose columns to repeat
by the same way. And I've also uploaded a same sheet for you. Download
the sheet from the link below:
Open the above sheet. You will find a worksheet named Rows to Repeat.
I've set top 3 rows to be repeated on every page. You can directly
check it by printing this two-page worksheet. Or simply check it in
Print Preview.
Hopefully, today's topic will be helpful for your study or office work . . . :)
